If you’ve been craving the perfect homemade chocolate truffles recipe, you’re in the right place. These melt in your mouth chocolate gems are surprisingly simple to make and deliver that luxurious, rich flavor you’d expect from a high-end chocolatier.
Whether you’re a complete beginner or a seasoned chocolate lover looking to impress guests, this guide will show you everything you need to create professional-quality truffles from your own kitchen. No fancy equipment required just quality ingredients and a little patience. Let’s dive into the chocolate magic.
Ingredients You’ll Need for Homemade Chocolate Truffles
Creating the perfect homemade chocolate truffles recipe starts with quality ingredients. Don’t cut corners here your taste buds will thank you later.
Essential Ingredients:
• 8 oz high-quality dark chocolate (60-70% cocoa content, chopped)
• ½ cup heavy cream (35% fat content works best)
• 2 tablespoons unsalted butter (room temperature)
• Pinch of sea salt
For Rolling and Coating:
• Unsweetened cocoa powder (Dutch-processed preferred)
• Chopped nuts (almonds, hazelnuts, or pistachios)
• Shredded coconut (unsweetened)
• Powdered sugar (for dusting)
Pro Tips for Ingredient Selection:
Chocolate quality matters. Skip the chocolate chips and invest in a good bar of chocolate. Brands like Valrhona, Ghirardelli, or even quality grocery store brands work beautifully. The chocolate should have a clean snap when broken.
Heavy cream is non-negotiable. Lower-fat alternatives won’t create the silky ganache texture you’re after. Trust me on this one I’ve tested it multiple times, and the results are disappointing with anything less than 35% fat content.
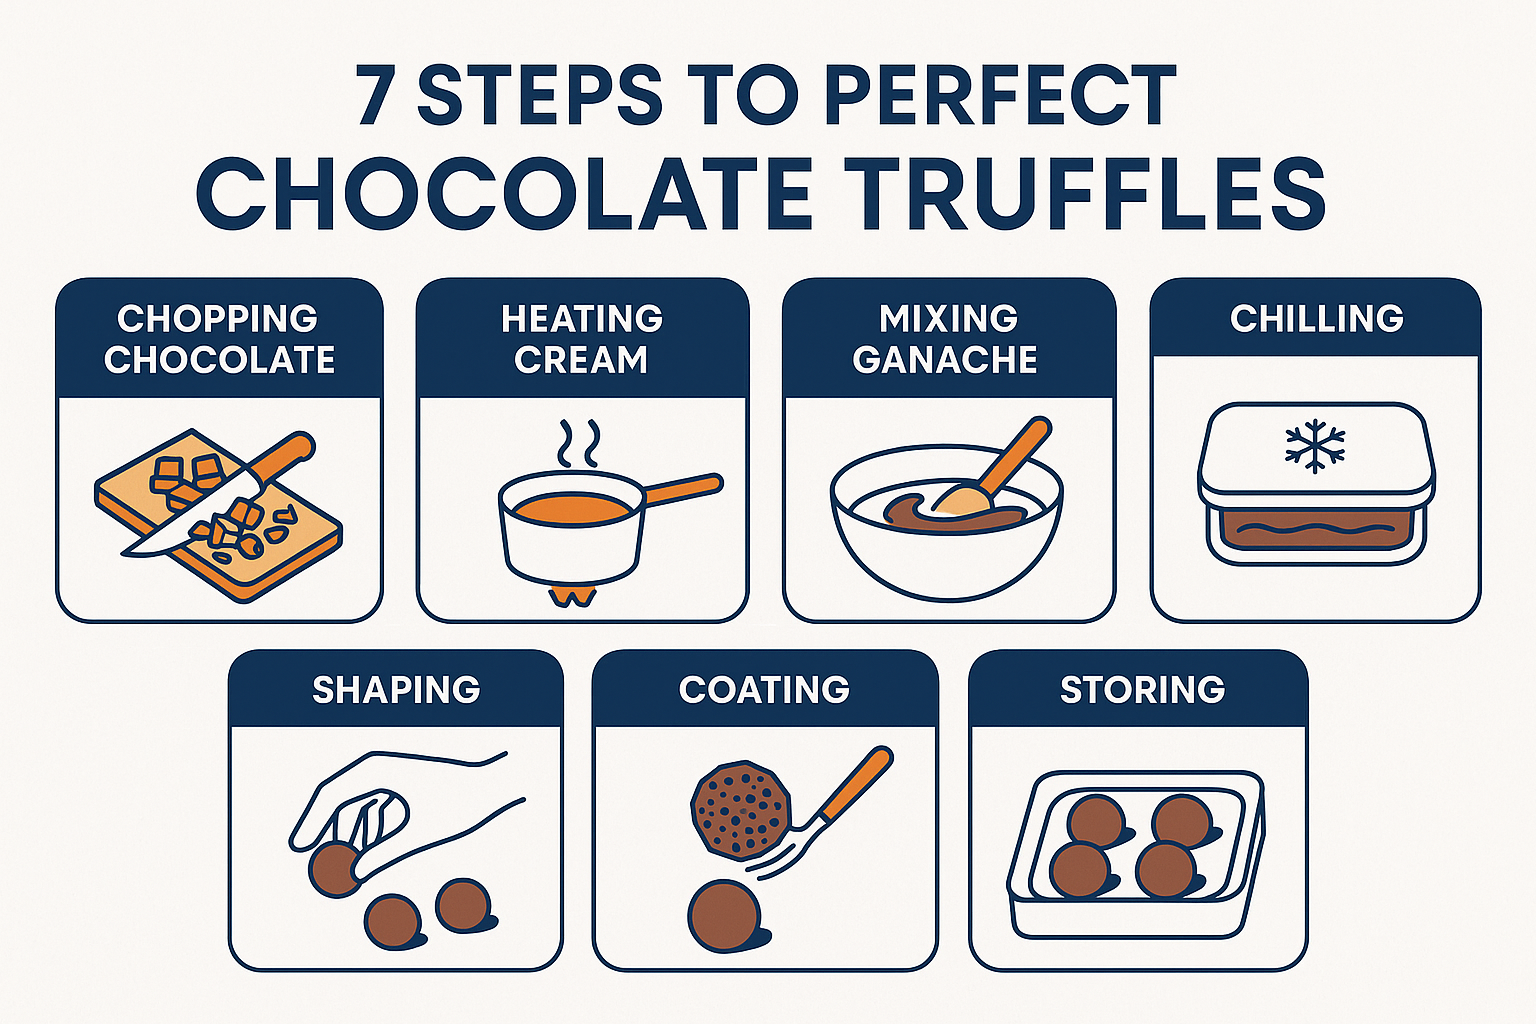
Step by Step Homemade Chocolate Truffles Recipe
Here’s where the magic happens. This homemade chocolate truffles recipe uses the classic ganache method that professional chocolatiers swear by.
Prepare Your Chocolate
Finely chop your chocolate and place it in a medium heatproof bowl. The smaller the pieces, the more evenly it will melt. Set aside.
Heat the Cream
Pour heavy cream into a small saucepan and heat over medium heat. Watch carefully—you want it to just reach a simmer with small bubbles around the edges. Don’t let it boil vigorously, or you’ll scorch the cream.
Create the Ganache
Pour the hot cream over the chopped chocolate. Let it sit for 2-3 minutes without stirring. This allows the heat to gently melt the chocolate.
After waiting, stir from the center outward with a wooden spoon or silicone spatula. The mixture should become smooth and glossy. If you see lumps, place the bowl over a pot of barely simmering water and stir until smooth.
Add Butter and Salt
Once your ganache is silky smooth, stir in the room temperature butter and a pinch of sea salt. This adds richness and enhances the chocolate flavor.
Chill the Ganache
Cover the bowl with plastic wrap, pressing it directly onto the surface of the ganache to prevent a skin from forming. Refrigerate for 2-4 hours until firm enough to scoop.
Shape the Truffles
Using a small cookie scoop or teaspoon, portion the ganache into 1-inch balls. Work quickly—the warmth of your hands will soften the mixture. Place shaped truffles on a parchment-lined baking sheet.
Final Coating
Roll each truffle in your chosen coating: cocoa powder, chopped nuts, or coconut. For the smoothest finish, roll between your palms one final time.
Storage tip: Refrigerate finished truffles for at least 30 minutes before serving to firm up the coating.
Tips for Perfect Chocolate Truffles Every Time
After making hundreds of batches (seriously!), I’ve learned these game-changing techniques that separate good truffles from incredible ones.
Temperature Control is Everything
• Room temperature matters: Let your ganache come to room temperature before shaping if it’s too firm
• Cool hands: Run your hands under cold water and dry them if the mixture keeps sticking
• Chill between steps: If truffles get too soft while working, pop them back in the fridge for 15 minutes
Common Mistakes to Avoid
Overheating the cream – This can cause the ganache to separate
Using chocolate chips – They contain stabilizers that prevent smooth melting
Skipping the resting time – Patience creates better texture
Working in a warm kitchen – Cool environments make everything easier
Texture Troubleshooting
Ganache too soft? Chill longer or add more chopped chocolate
Ganache too firm? Let it warm slightly at room temperature
Grainy texture? Your cream was too hot—next time, let it cool for 30 seconds before pouring
Flavor Variations You Can Try
Once you’ve mastered the basic homemade chocolate truffles recipe, the flavor possibilities are endless. Here are my most requested variations:
Dark Chocolate Truffle Variations:
• Espresso Truffles: Add 1 tablespoon instant espresso to the warm cream
• Orange Truffles: Stir in 2 teaspoons orange zest and 1 tablespoon orange liqueur
• Spiced Truffles: Add ¼ teaspoon cinnamon and a pinch of cayenne pepper
• Rum Truffles: Replace 2 tablespoons cream with dark rum
White Chocolate Truffles:
Use the same technique but with 8 oz white chocolate and reduce cream to ⅓ cup. White chocolate is more delicate, so watch your temperatures carefully.
Holiday Truffle Ideas:
• Peppermint: Add ½ teaspoon peppermint extract and roll in crushed candy canes
• Gingerbread: Mix in ½ teaspoon each of ground ginger, cinnamon, and nutmeg
• Eggnog: Replace 2 tablespoons cream with eggnog and add a pinch of nutmeg
Easy Chocolate Truffle Recipe Shortcuts:
Short on time? Make easy chocolate truffles by using this 3-ingredient version: 8 oz chocolate, ½ cup cream, and your favorite coating. Skip the butter for a slightly firmer texture that’s perfect for beginners.
How to Store and Serve Homemade Chocolate Truffles
Proper storage keeps your homemade chocolate truffles fresh and delicious for weeks.
Storage Guidelines:
• Refrigerated: Store in an airtight container for up to 2 weeks
• Frozen: Freeze for up to 3 months in a freezer-safe container
• Room temperature: Only for 2-3 days in cool, dry conditions
Serving Suggestions:
Gift boxes- Arrange in small paper cups in decorative boxes
Dessert platters-Serve alongside fresh berries and champagne
Coffee pairings-Perfect with espresso or dark roast coffee
Wine pairings- Complement red wine or port beautifully
Presentation Tips:
• Let refrigerated truffles sit at room temperature for 10-15 minutes before serving
• Dust with a light coating of cocoa powder just before presenting
• Arrange on a marble board or elegant plate for special occasions
• Include flavor cards if giving as gifts—people love knowing what they’re eating!
Packaging for Gifts:
The best part about this homemade chocolate truffles recipe? They make incredible gifts that show you care. Package them in small boxes lined with parchment paper, or arrange in mason jars with ribbon for a rustic touch.
Conclusion- Ready to Try This Homemade Chocolate Truffles Recipe?
There you have it everything you need to create restaurant-quality chocolate truffles in your own kitchen. This homemade chocolate truffles recipe proves that luxury desserts don’t require professional training or expensive equipment, just quality ingredients and the right technique.
The beauty of homemade truffles lies in their versatility. Start with the classic version, then experiment with flavors that excite you. Your friends and family will be amazed that something so elegant came from your kitchen.
Ready to get started? Gather your ingredients, clear some space in your fridge, and prepare for chocolate magic. Once you taste these rich, creamy truffles, you’ll never want to buy in the store again.
Try this recipe and let the chocolate magic melt your heart! Share your favorite flavor combinations in the comments I love hearing about your creative twists on this classic treat.